


This guide explains how to build a home solar PV monitoring system with IAMMETER, from choosing the right meter to viewing solar production, grid import/export, self-consumption, and electricity savings in IAMMETER-Cloud.
If you want the complete application overview before starting the setup, see:
IAMMETER's goal is not only to display energy data. The real value is helping solar users understand where the energy goes, use more solar energy inside the home, reduce grid import, and improve the return on the solar investment.
A typical inverter app shows solar generation, but it may not show the full energy flow of the home.
With IAMMETER, you can monitor:
| Item | What it means |
|---|---|
| Solar production | Energy generated by the solar inverter |
| Home consumption | Energy used by household loads |
| Grid import | Electricity purchased from the grid |
| Grid export | Surplus solar energy exported to the grid |
| Self-consumption | Solar energy used directly inside the home |
| Feed-in energy | Solar energy sent back to the utility grid |
| Bill and saving | Electricity cost, feed-in income, and total solar benefit |
These values help answer practical questions:
IAMMETER monitors real energy flow by measuring the grid side and, when needed, the inverter side.
A common home solar monitoring setup includes:
The exact wiring depends on the electrical system:
For detailed wiring diagrams, see:
The right device depends on your grid type, inverter type, and whether you want to monitor an additional load.
| Device | Best fit | Notes |
|---|---|---|
| WEM3080 | Basic single-phase grid or inverter monitoring | Single-channel meter |
| WEM2067 | Single-phase home solar or split-phase residential monitoring | Dual-channel meter, suitable for grid + inverter monitoring |
| WEM3050T | Cost-effective home solar monitoring for single-phase, split-phase, and three-phase scenarios | Three channels, flexible for grid/inverter/load monitoring |
| WEM3080T | Professional three-phase or split-phase monitoring | Includes IAMMETER-Cloud Pro |
| WEM3046T | High-current projects with external CTs | Suitable when custom CT ratios are required |
| WPC3700 | Solar surplus control for resistive loads | Dynamically adjusts boiler or heater power based on surplus solar energy |
For most residential solar users who want a cost-effective solution, WEM2067 and WEM3050T are the main options.
Correct wiring is the foundation of accurate solar monitoring.
To calculate solar production, grid import/export, home consumption, and self-consumption, IAMMETER needs to know how energy flows between:
Typical wiring rules:
Use Type for each channel, such as Grid, Inverter, or Load.For complete wiring examples, including single-phase, split-phase, and three-phase systems, use this guide:
After the meter is installed and connected to Wi-Fi, add it to IAMMETER-Cloud.
The basic steps are:
Use Type.You can also visit the IAMMETER demo account to explore the solar PV monitoring interface:
The interface may look different on desktop and mobile. A desktop browser is recommended when reviewing detailed reports.
After setup, IAMMETER-Cloud can display the real-time energy flow of the solar PV system.
You can view:
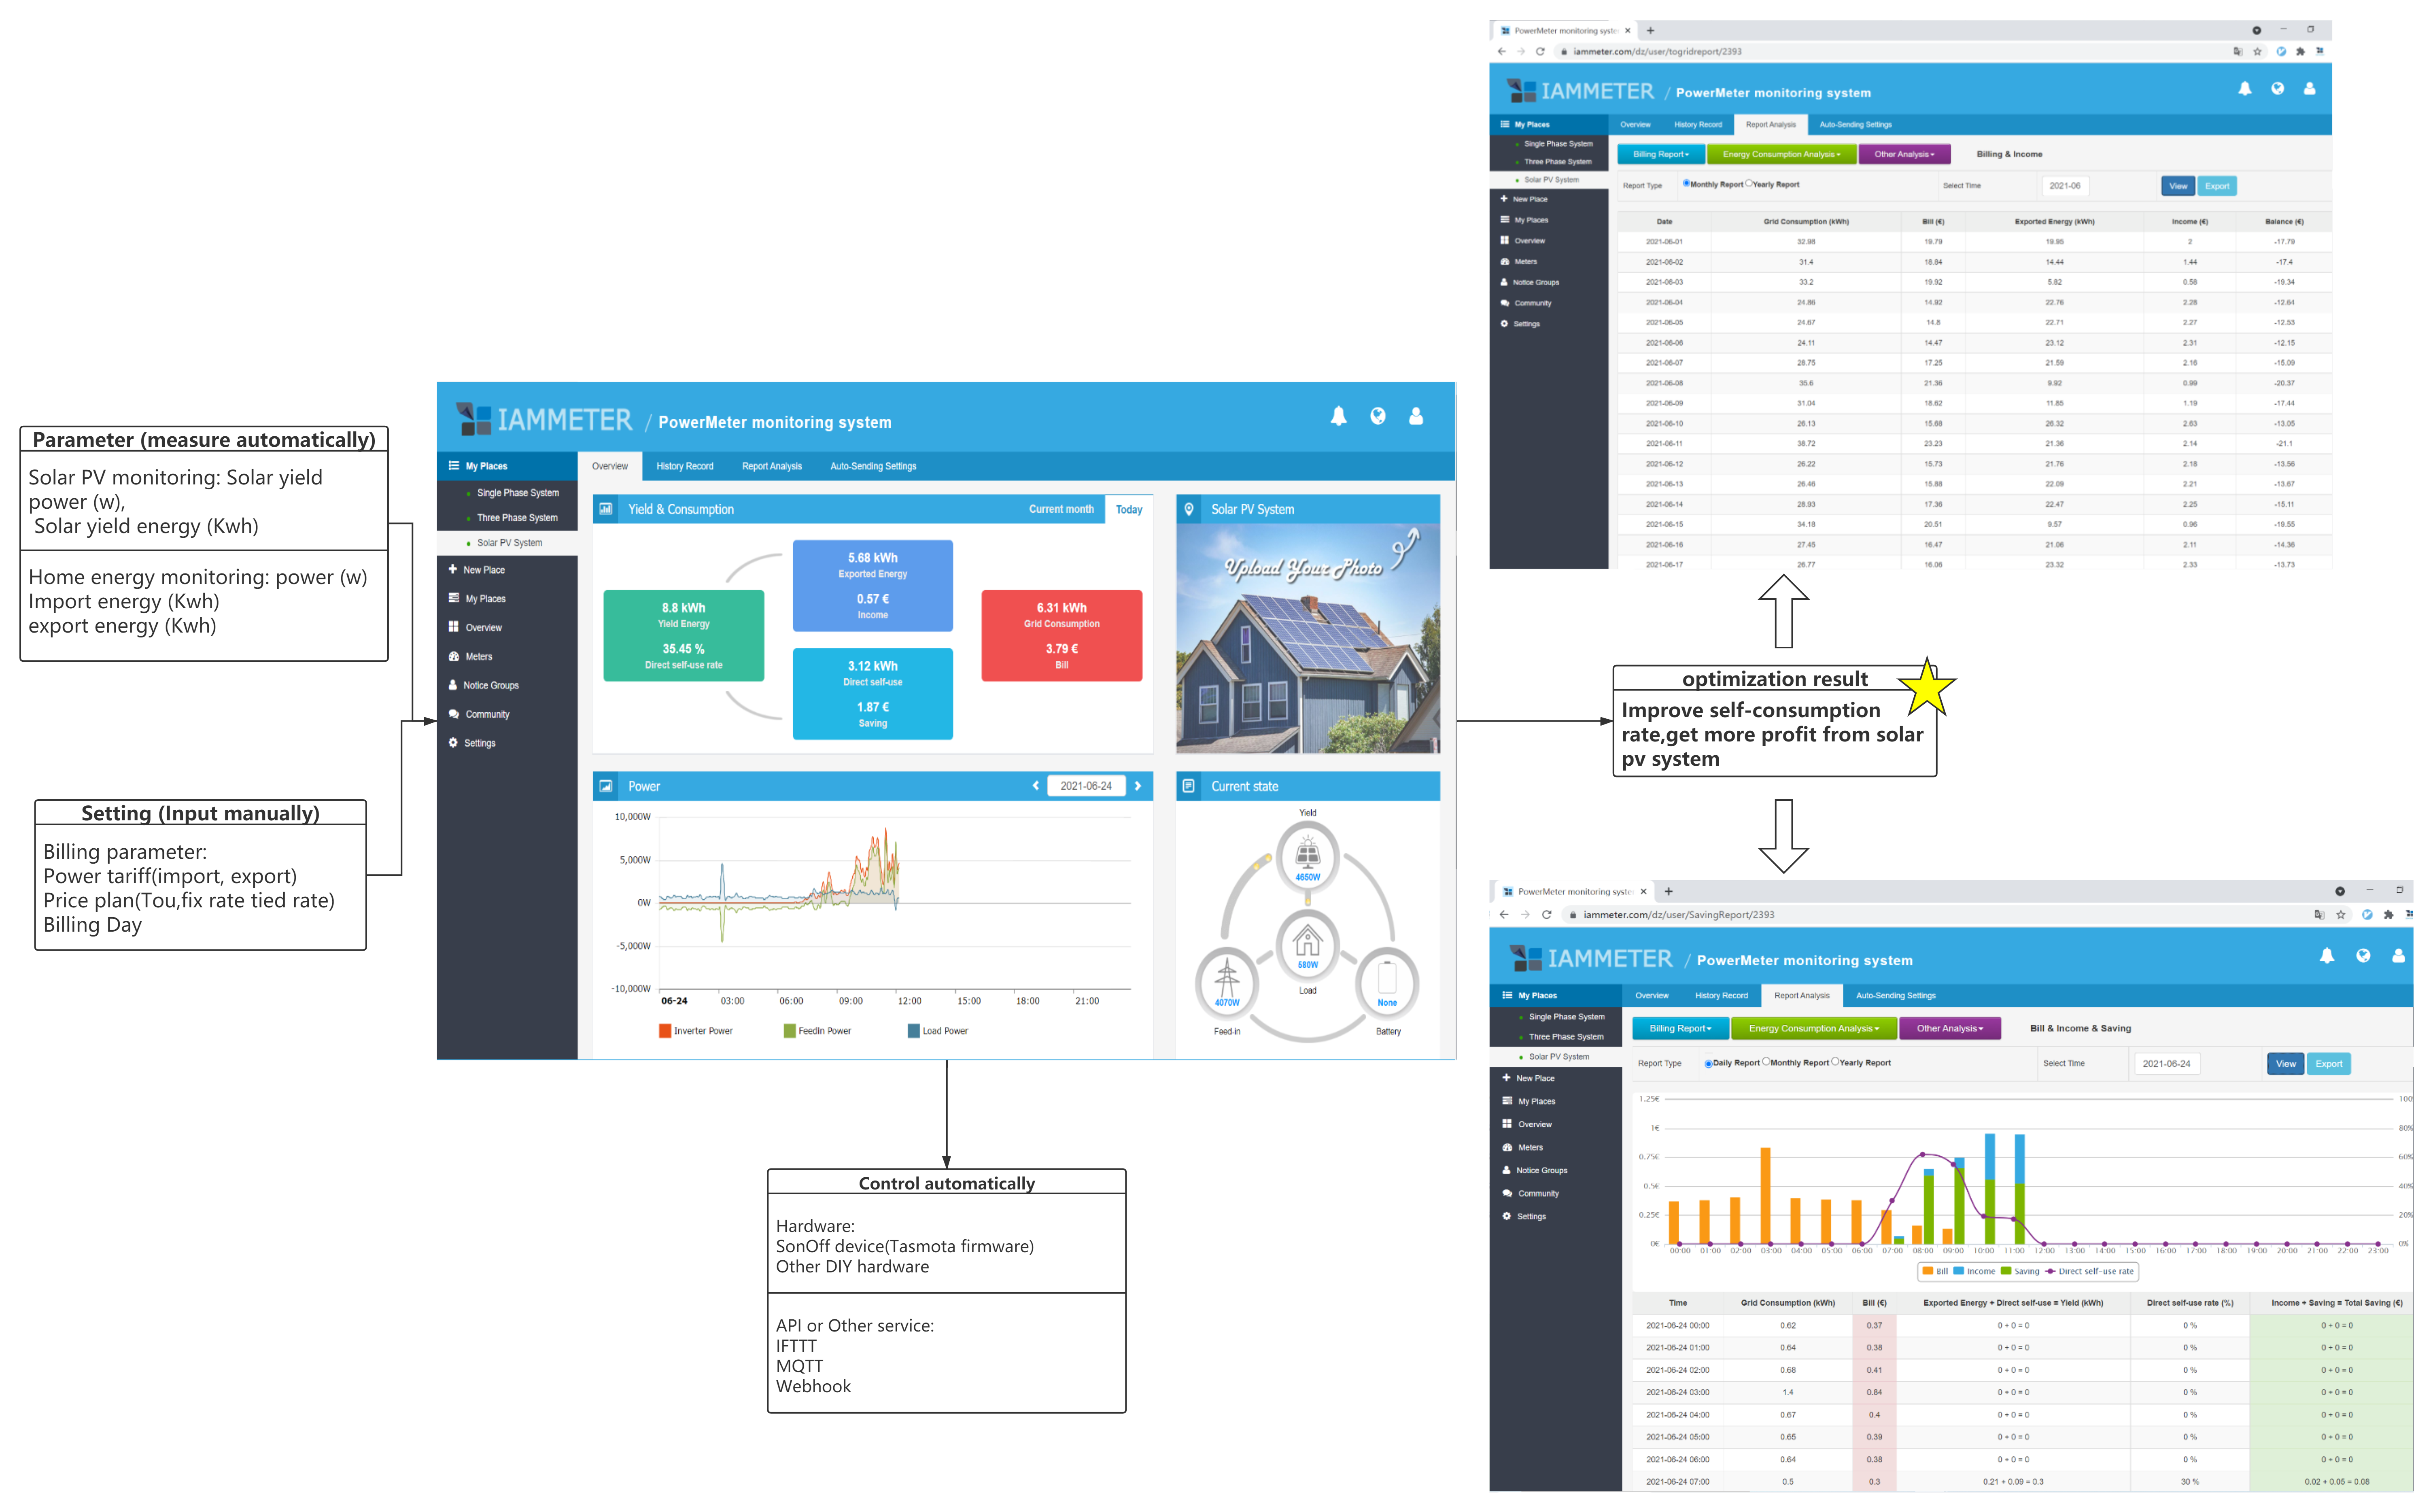
The real-time dashboard helps users quickly understand whether the home is:
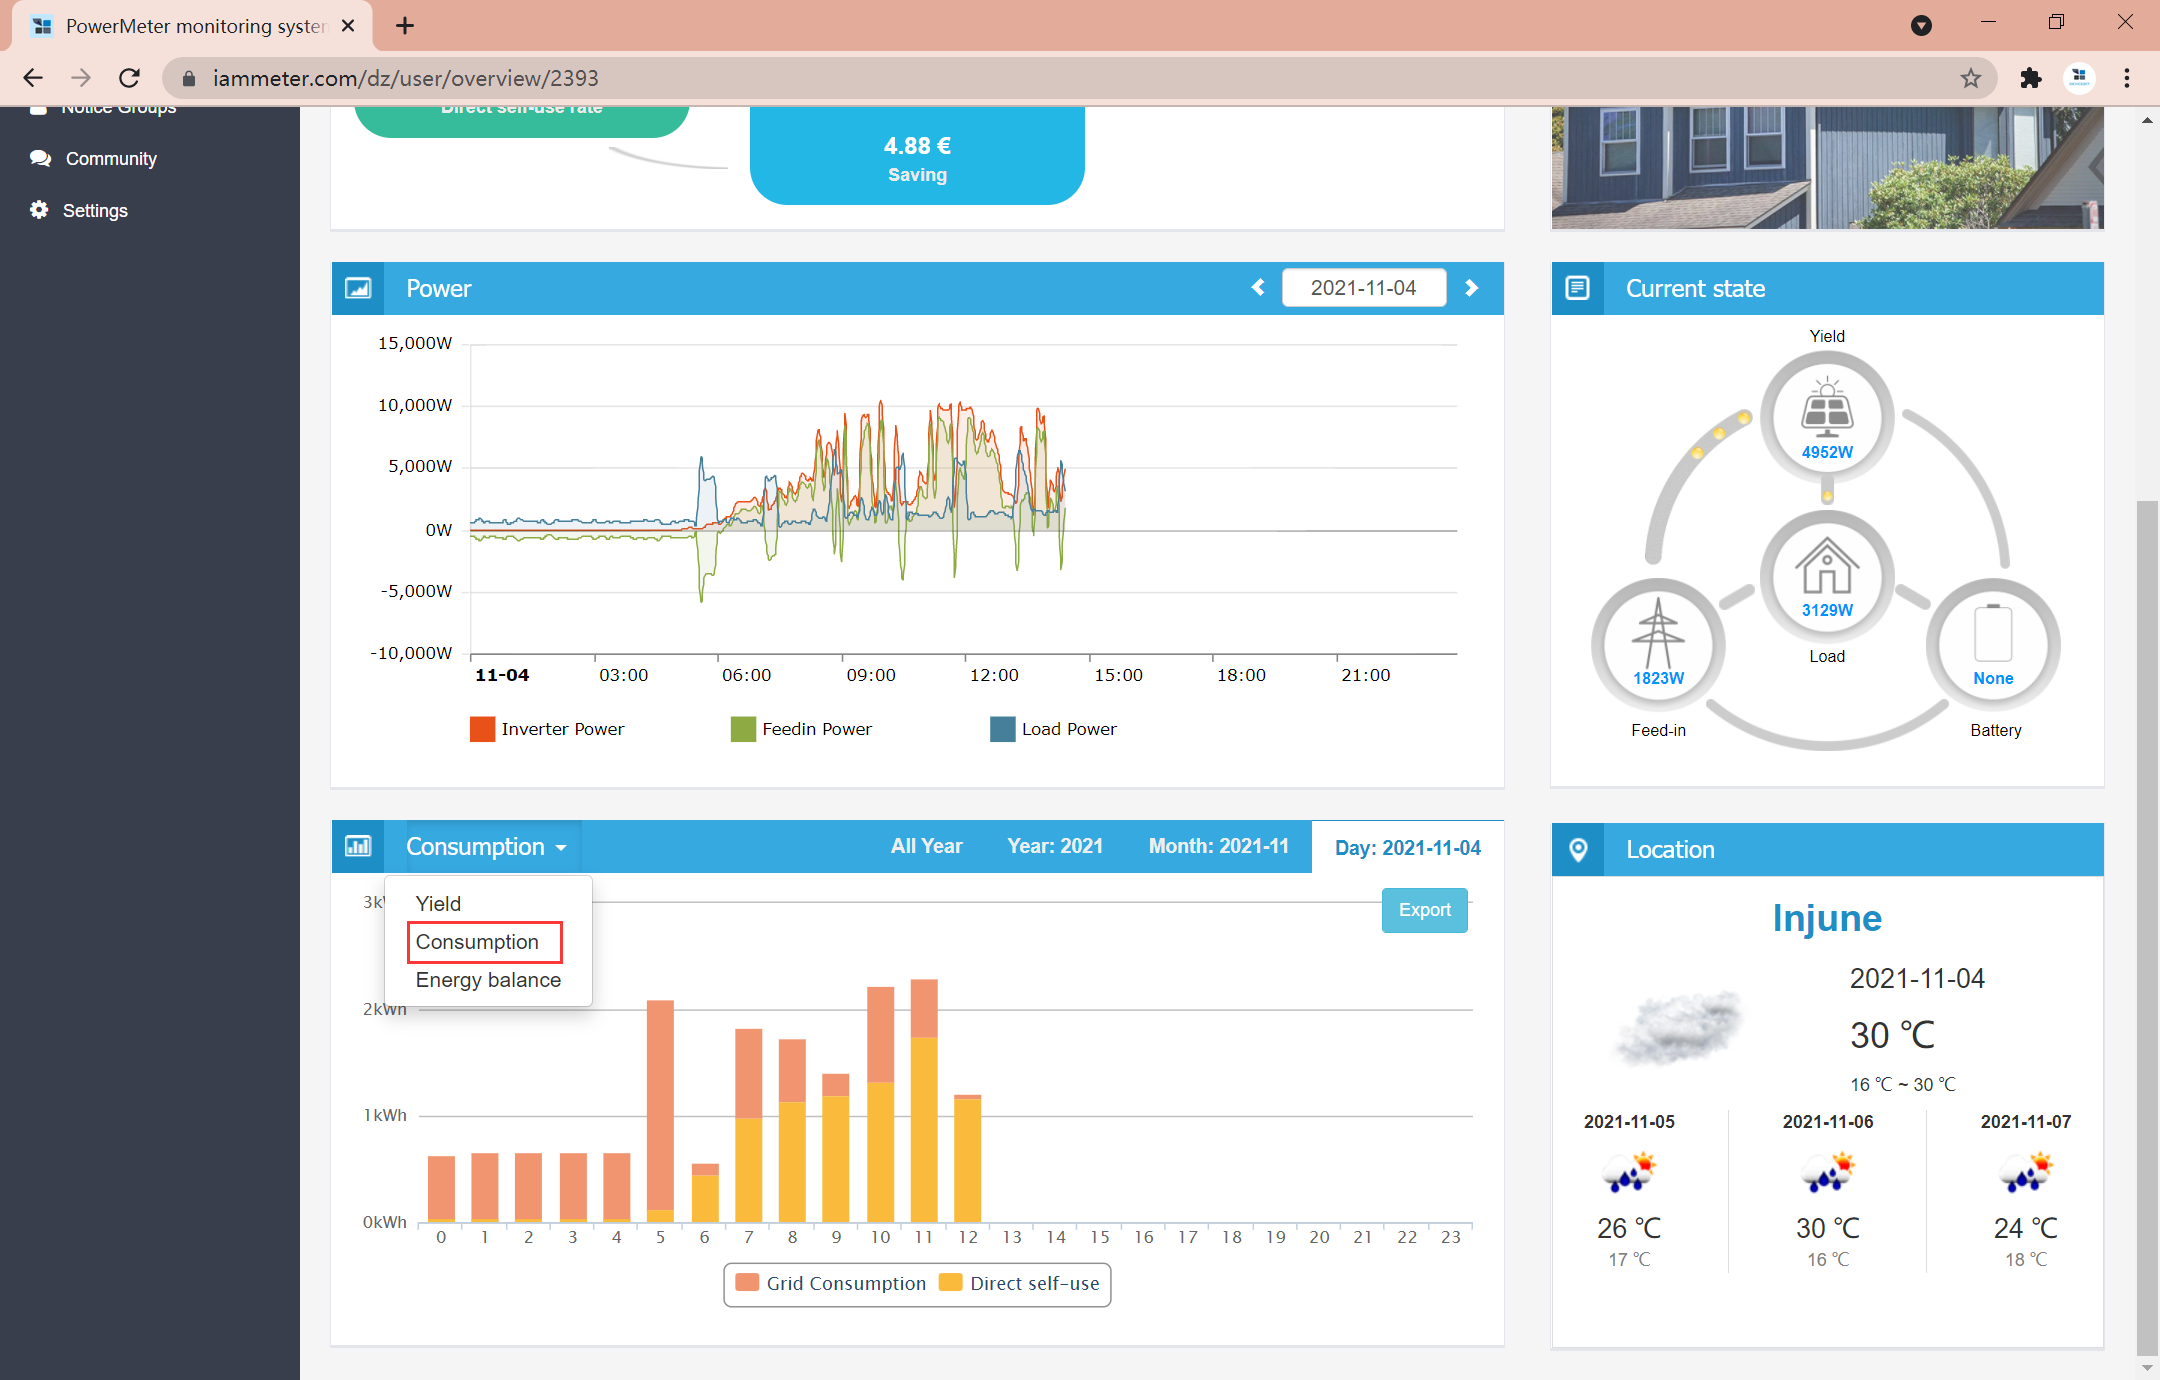
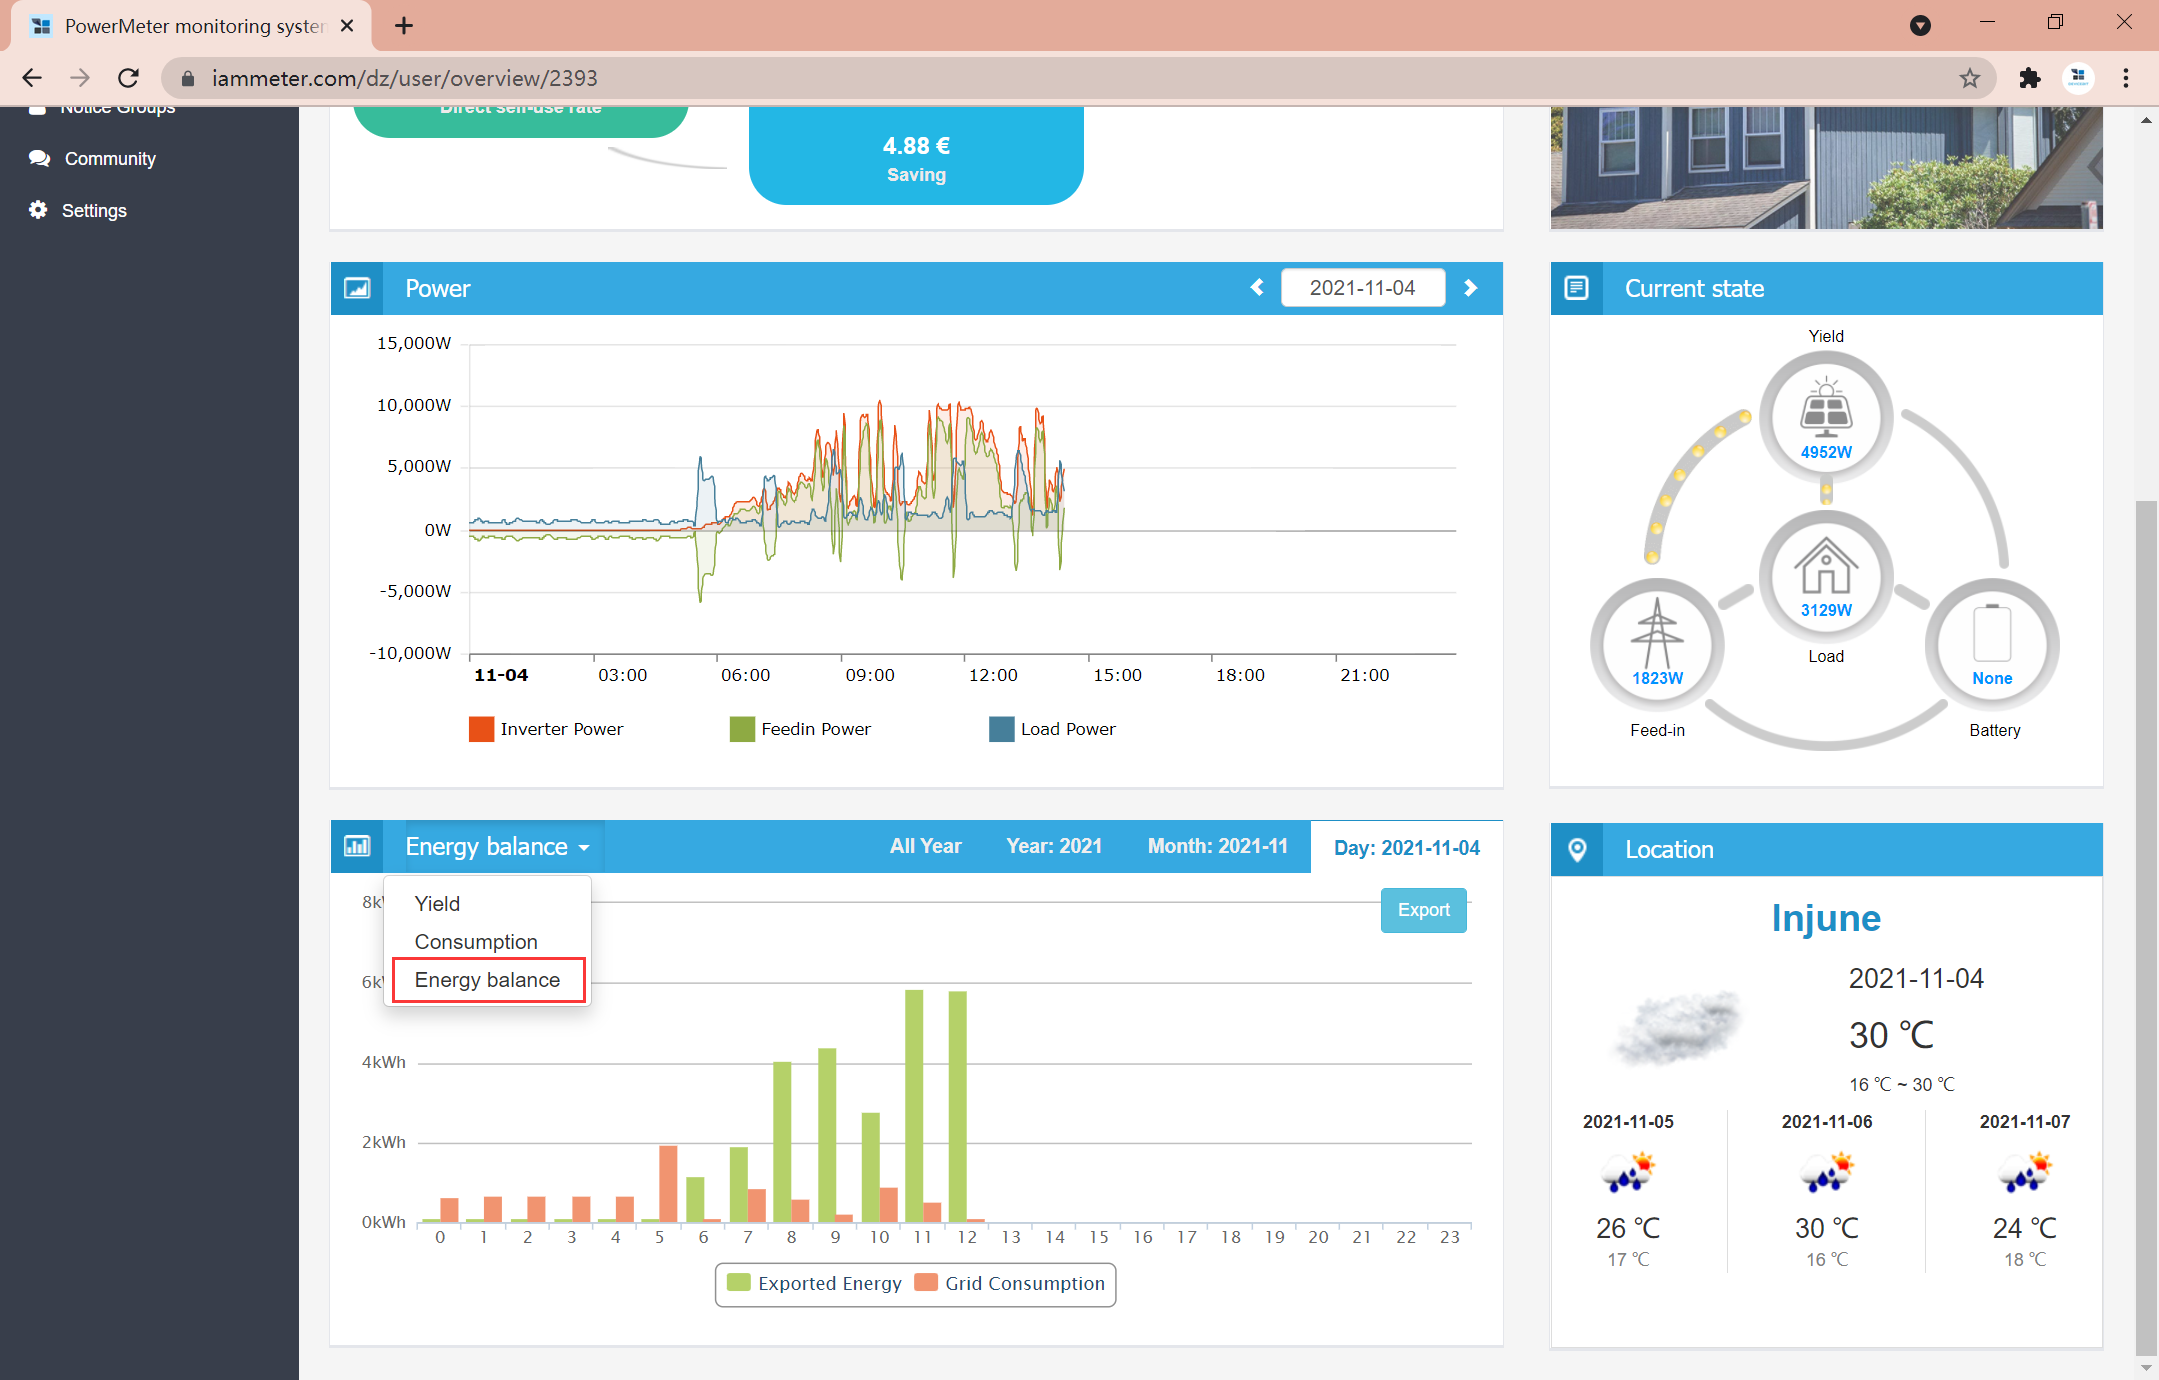
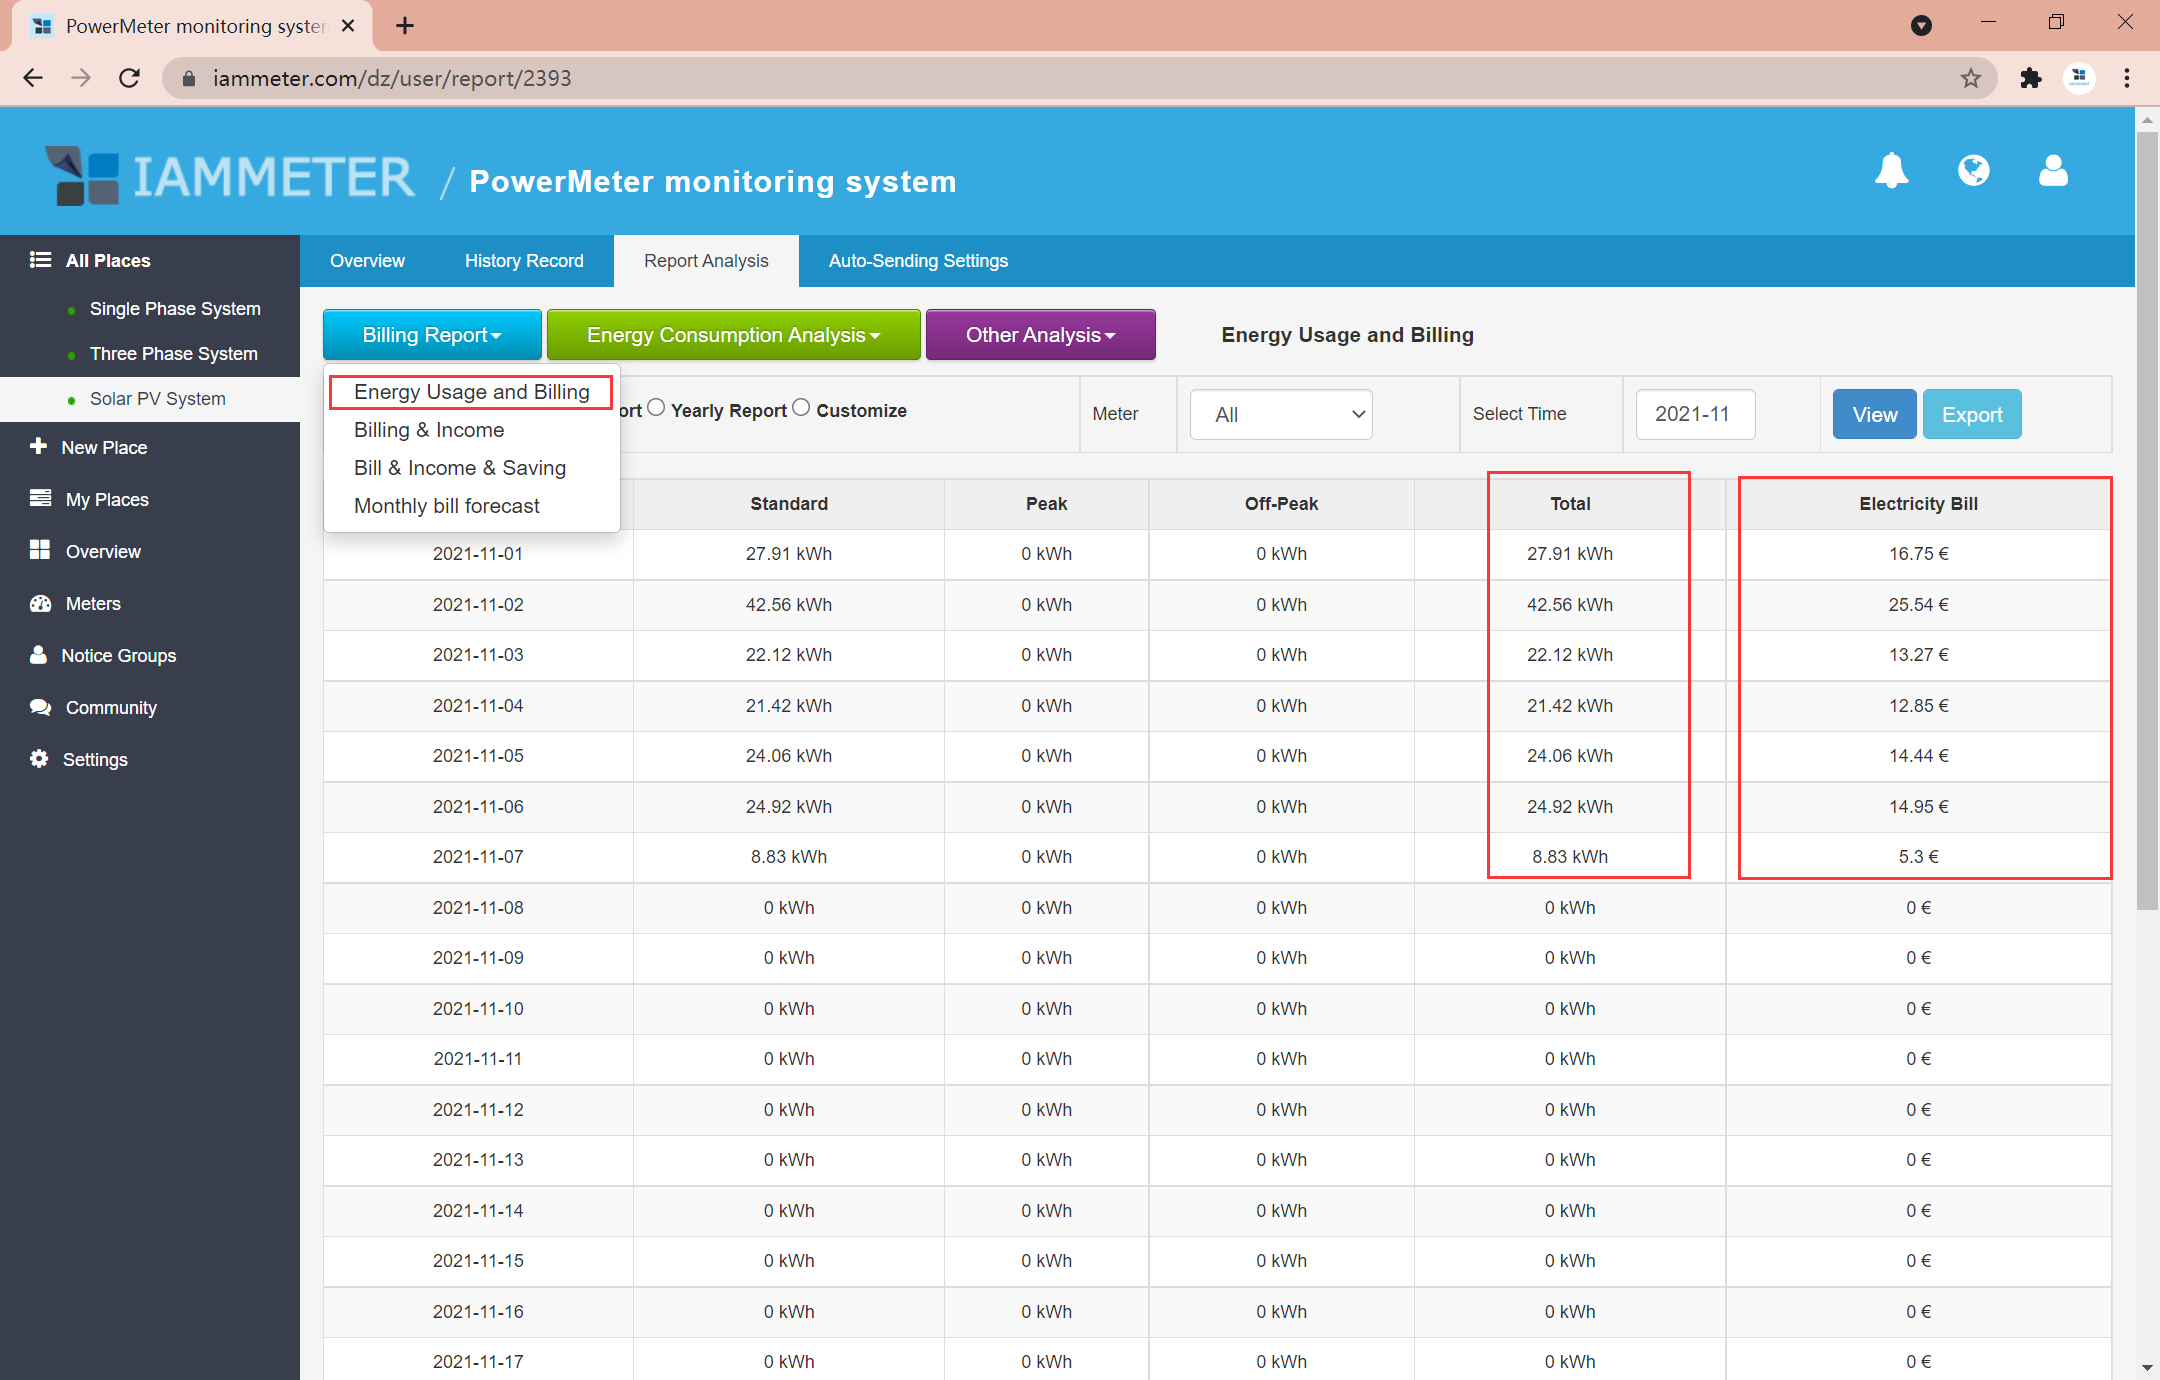
IAMMETER-Cloud provides reports for understanding solar performance over time.
Solar yield energy can be viewed by hour, day, month, or year.
Solar yield energy = direct self-use energy + export to grid energy.

Consumption energy = direct self-use energy + grid import energy.
This helps users understand how much household electricity is covered by solar and how much is still purchased from the grid.
IAMMETER can show import and export energy together.
This is important for users who want to understand net metering, feed-in energy, and grid dependence.
IAMMETER supports different electricity price plans, including fixed rate, tiered rate, TOU rate, and advanced TOU rate.
Reports can help analyze:
Learn more:
Monitoring tells you when surplus solar energy is available. The next step is to use more of that energy inside the home.
With the WPC3700 Wi-Fi Power Controller, IAMMETER can dynamically adjust the power of a resistive load, such as a boiler or water heater, based on real-time solar surplus.
For example, if the grid threshold is set to zero, the boiler can operate only when surplus solar energy is available. This helps reduce grid import, reduce grid export, and improve self-consumption.
Learn more:
In addition to IAMMETER-Cloud, IAMMETER meters support local and self-hosted integrations.
Options include:
These options are useful for advanced users who want local data ownership, custom dashboards, or automation logic.
Learn more:
If you are setting up a home solar monitoring system with IAMMETER, follow this order:
Use Type correctly in IAMMETER-Cloud.Related pages:

Three Phase Wi-Fi Energy Meter (WEM3080T)

Single Phase Wi-Fi Energy Meter (WEM3080)
")
Three Phase Wi-Fi Energy Meter (WEM3046T)
")
Three Phase Wi-Fi Energy Meter (WEM3050T)