


IAMMETER Wi-Fi Energy Meter: Local APIs and Open Interfaces
IAMMETER Wi-Fi Energy Meter: Local APIs and Open Interfaces
IAMMETER Wi-Fi energy meters support IAMMETER-Cloud as well as local and third-party integrations.
The available interfaces include:
- Local HTTP API over the LAN
- MQTT and MQTTS publishing
- Modbus TCP
- TCP/TLS upload
- HTTP/HTTPS upload
- Stand-alone local operation
These interfaces allow IAMMETER meters to act as open data sources for:
- Home Assistant and other smart-home platforms
- Node-RED automation
- Self-hosted dashboards
- PLC and SCADA systems
- Custom Energy Management Systems (EMS)
- Custom Building Management Systems (BMS)
- Third-party data servers
This guide describes the current firmware and WebUI first. Screenshots and configuration methods for older firmware are retained in the final Legacy section.
For a ready-to-use application built on these capabilities, see Home Energy Monitoring, Solar Energy Monitoring, or local monitoring without Internet access.
1) Update to the Latest Firmware
IAMMETER firmware is updated continuously. Before configuring an integration, check the current release and model compatibility:
The latest firmware WebUI exposes the commonly used configuration options directly. Manual configuration API calls retained later in this article are mainly useful when maintaining older installations.
2) Choose the Run Mode in the Current WebUI
Select a run mode according to where the meter should send data or how it should operate locally.
| Mode | Behavior | Typical use |
|---|---|---|
| Cloud | Upload to IAMMETER-Cloud | Ready-to-use dashboards and reports |
| TCP | Upload to a third-party endpoint with TCP, TLS, or the supported TCP-mode configuration | Custom server ingestion |
| HTTP | Post data to a third-party HTTP/HTTPS endpoint | REST or web backend |
| MQTT | Publish directly to an MQTT or MQTTS broker | Home automation and secure IoT messaging |
| Stand-Alone | Do not upload; answer local API or Modbus TCP requests | LAN-only or self-hosted monitoring |
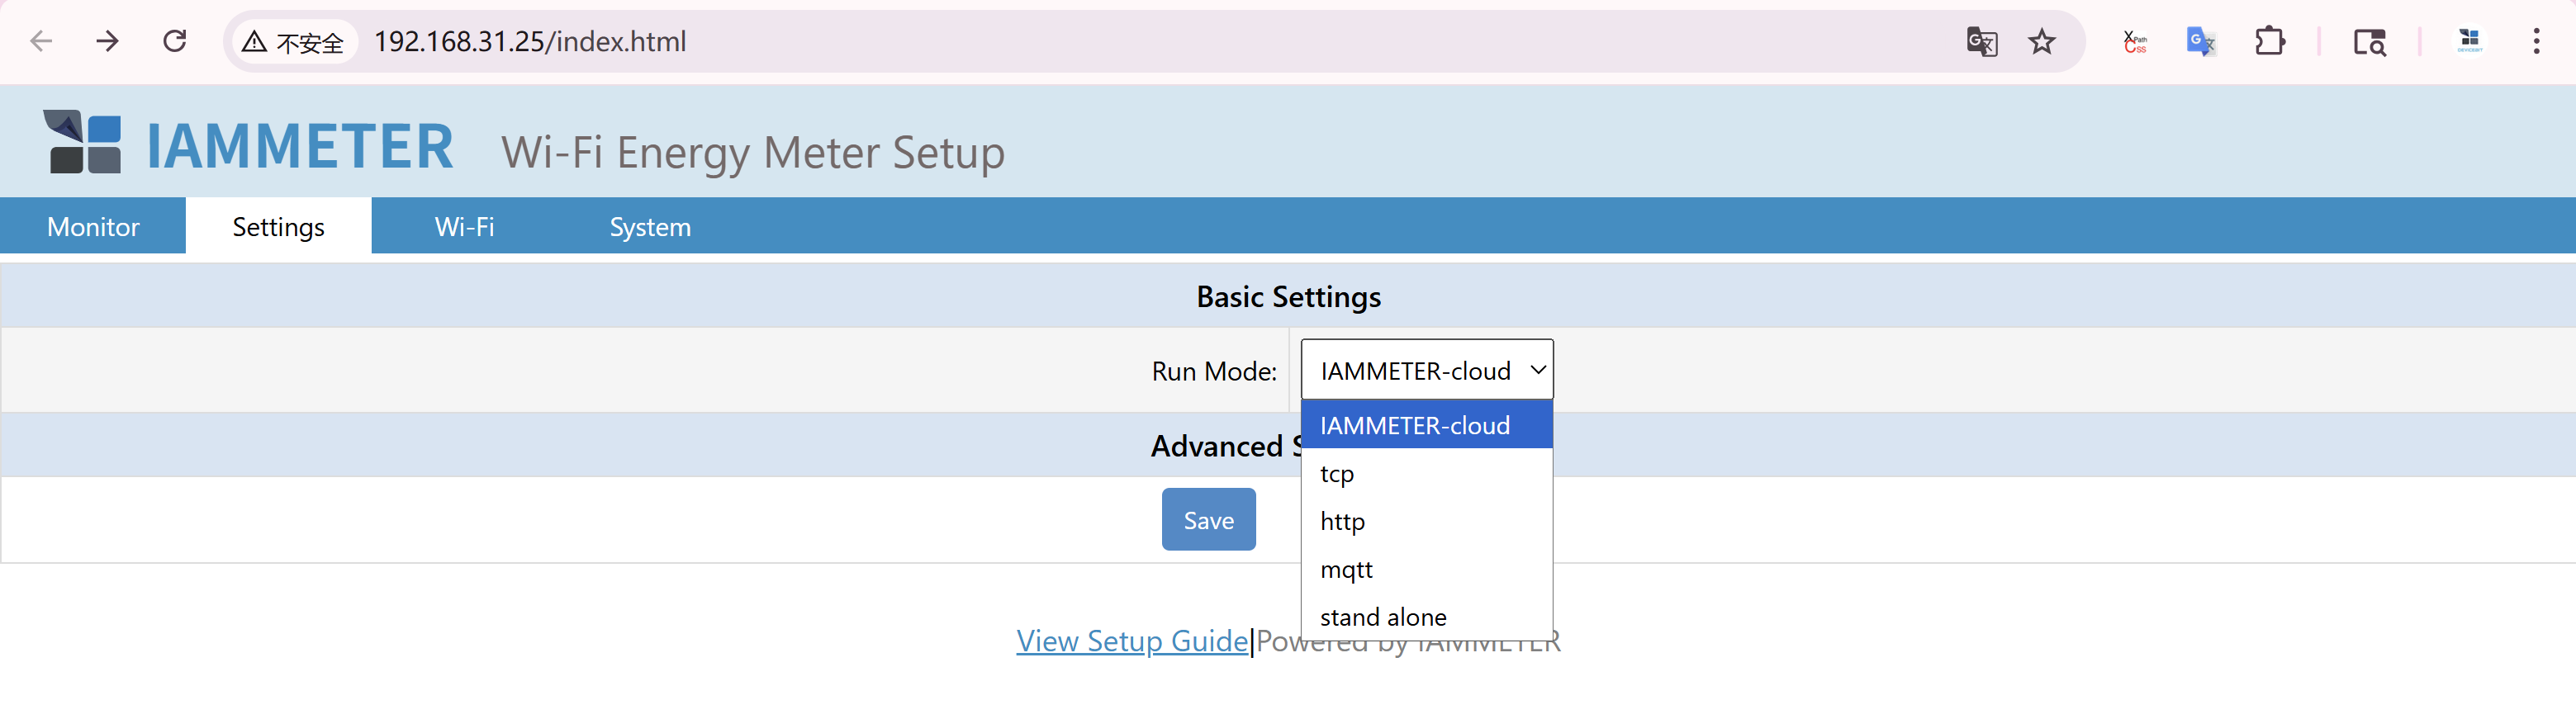
The run mode controls data upload behavior. Local API and Modbus TCP availability should still be checked for the meter model, firmware and selected integration.
3) Why the Open Interfaces Matter
Open interfaces let users decide where electricity data is processed and stored.
Typical reasons include:
- Keeping measurements inside the local network
- Sending telemetry to an existing server
- Connecting energy data with Home Assistant or Node-RED
- Building custom dashboards and alarms
- Combining electricity data with tariffs, solar or load-control logic
- Operating at a site with limited or unreliable Internet access
Cloud and local access are not necessarily mutually exclusive. The suitable architecture depends on whether the project needs IAMMETER-Cloud reports, a local platform, a third-party server, or a combination.
4) Push Data to a Third-party Server
4.1 TCP and TLS
IAMMETER can push meter data to a TCP or TLS endpoint.
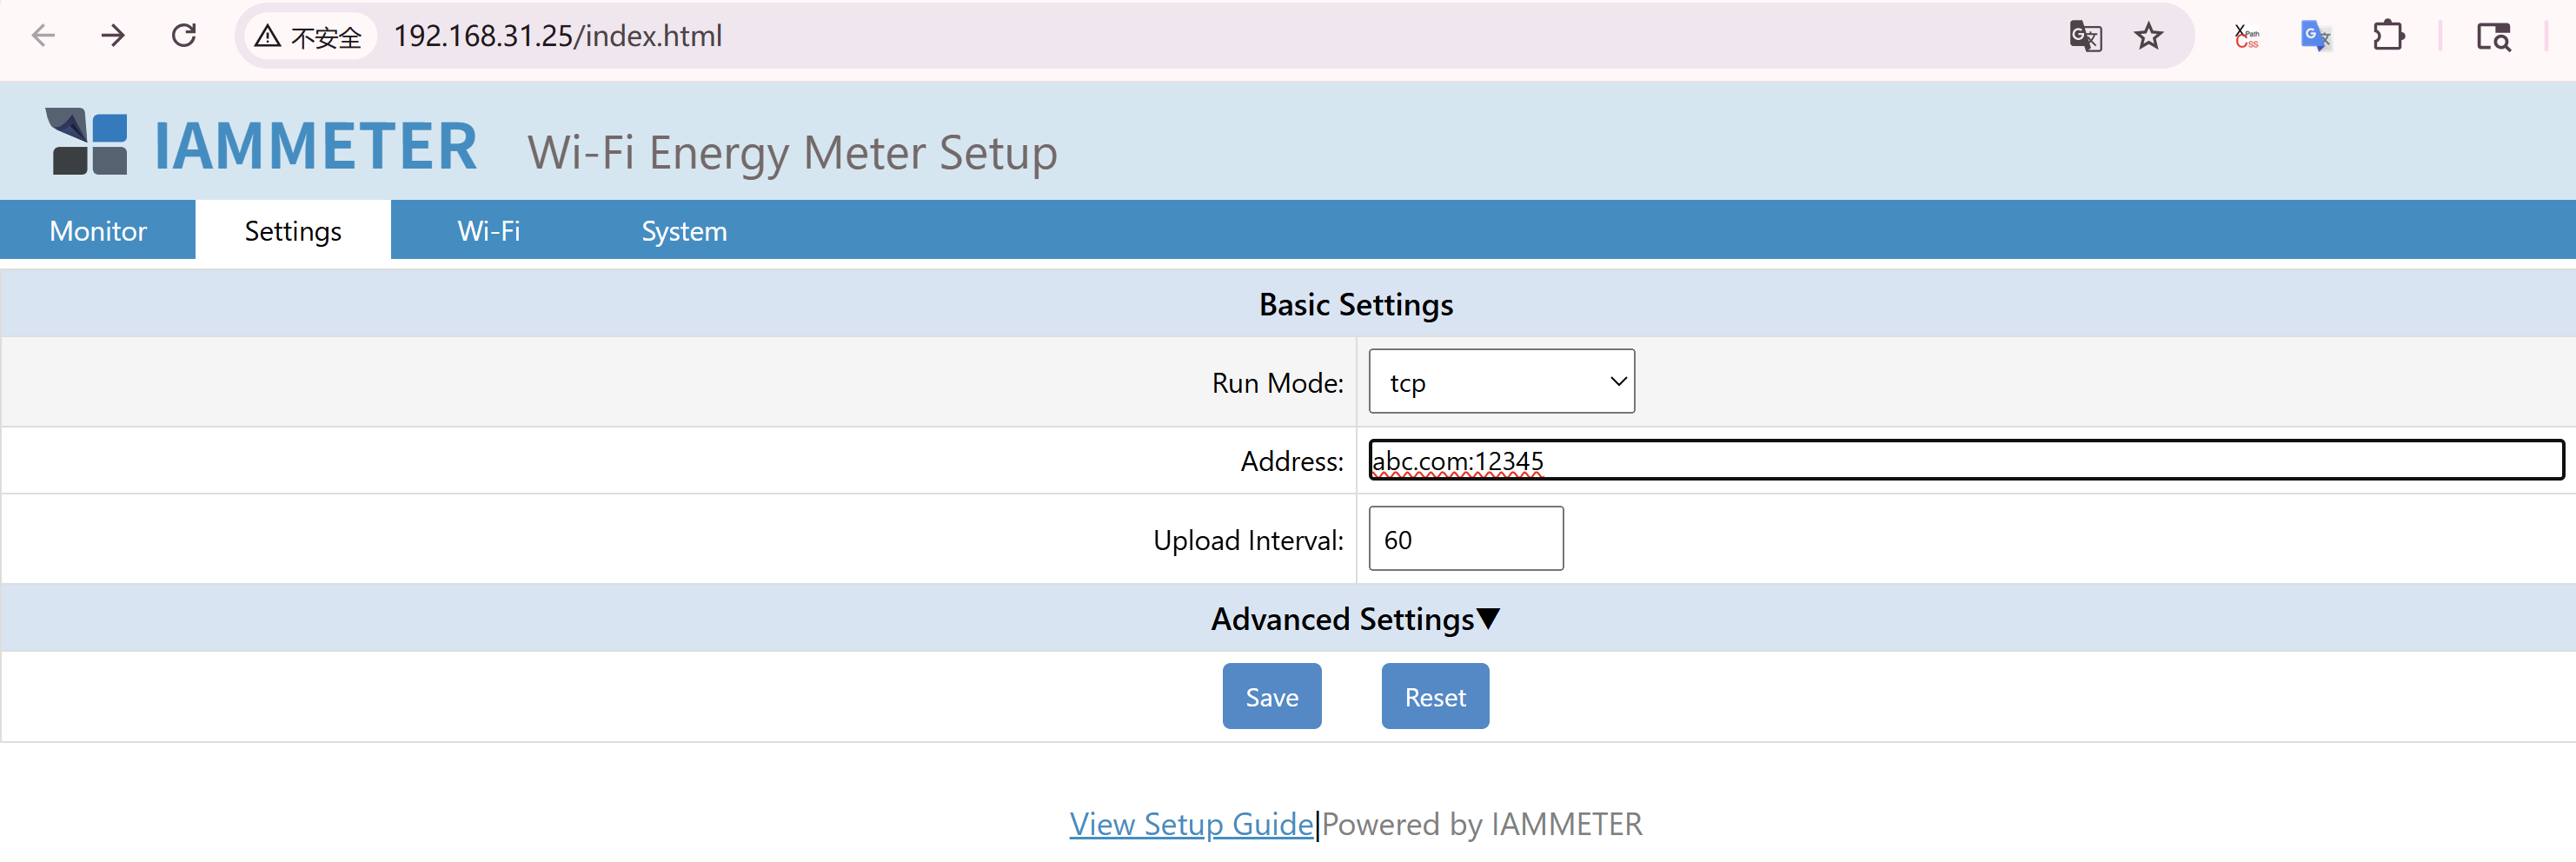
In the current WebUI:
- Select the TCP run mode.
- Enter the destination address.
- Configure the upload interval.
- Save the settings and verify data at the receiving server.
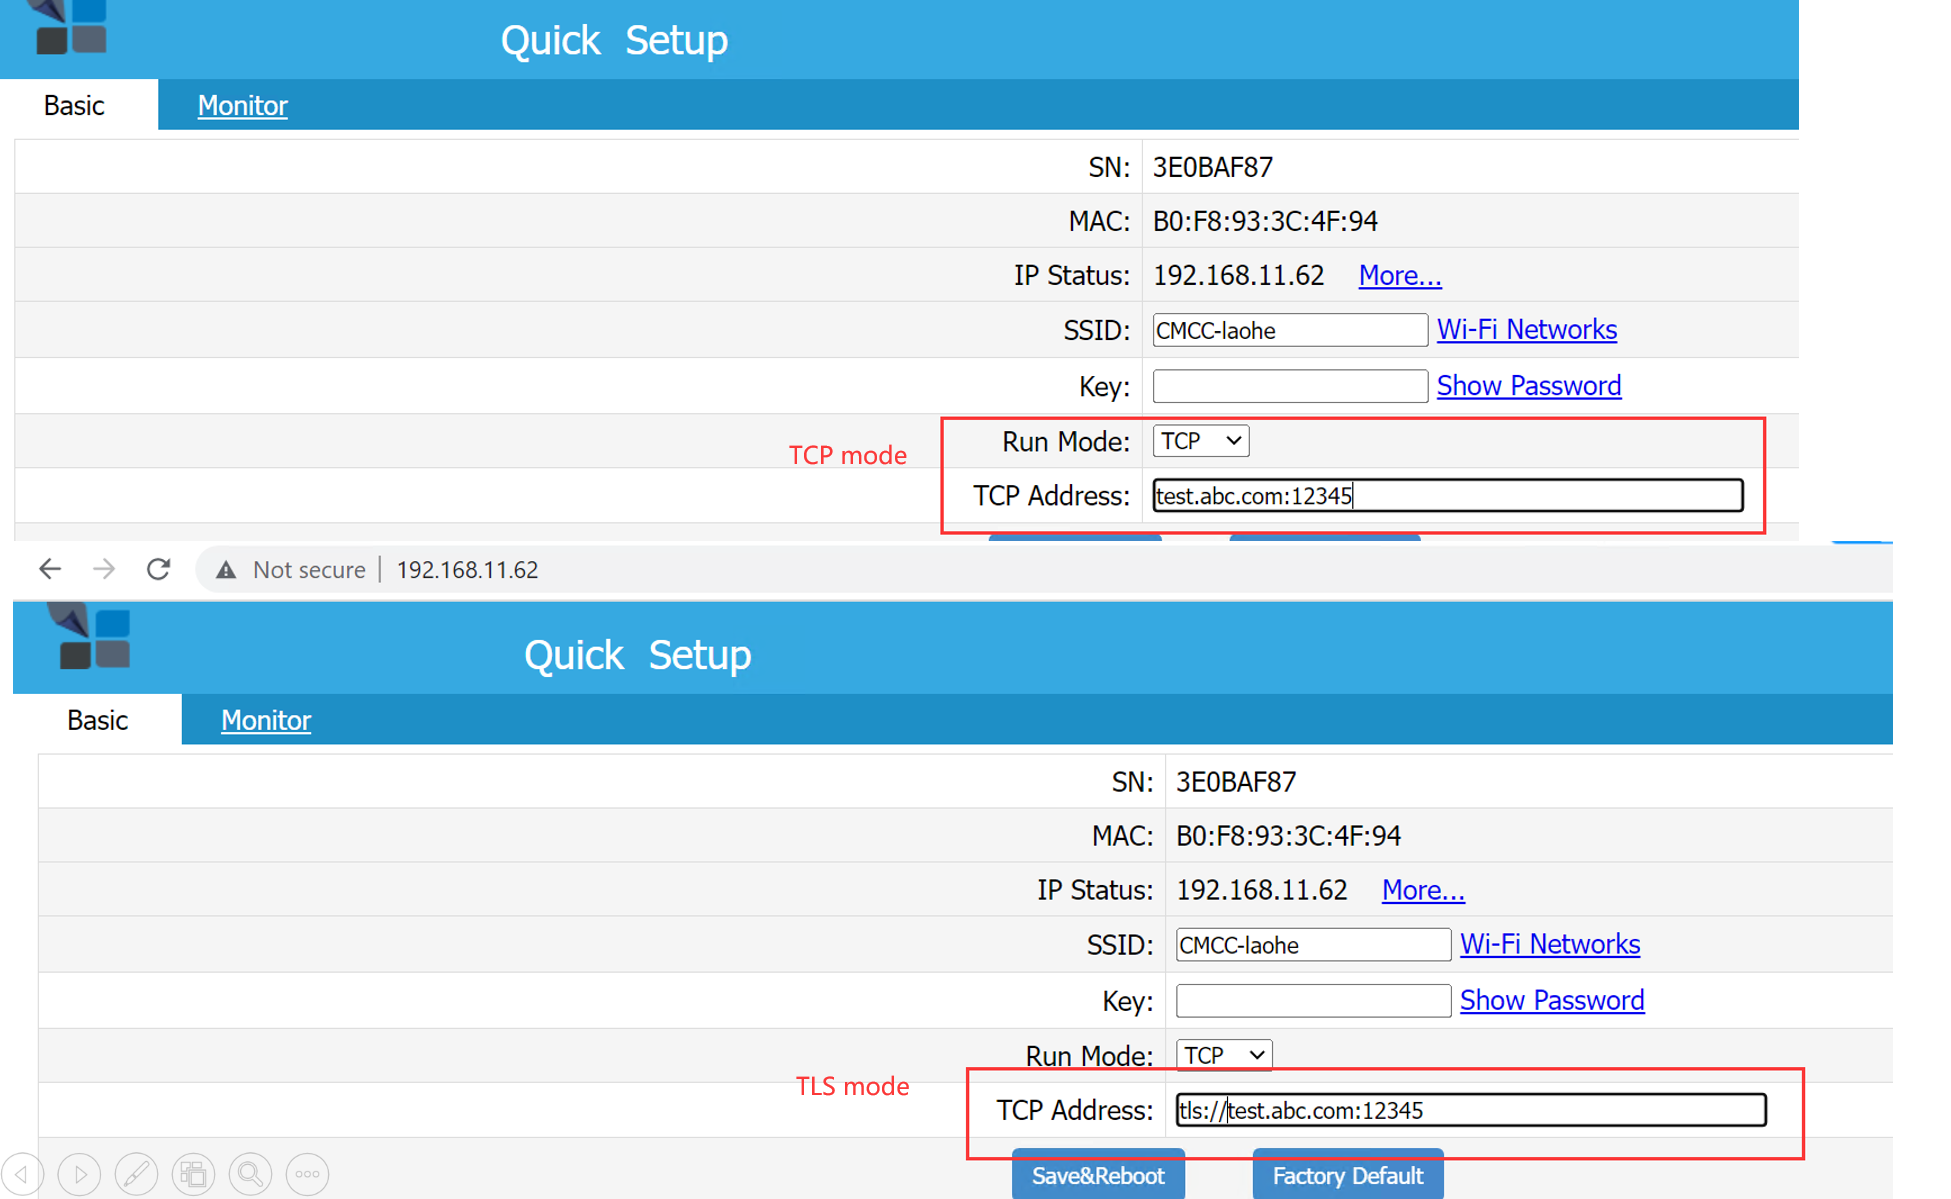
For a TCP server, use:
{domain-or-ip}:{port}
Example:
abc.com:12345
For a TLS server, use:
tls://{domain-or-ip}:{port}
Example:
tls://abc.com:12345

The current firmware overview documents a minimum upload interval of 2 seconds. Confirm the current firmware and receiving-server capacity before selecting a short interval.
4.2 MQTT and MQTTS
IAMMETER can publish telemetry directly to a plain MQTT broker or use MQTTS for encrypted transport on supported firmware.
In the current WebUI:
- Select the MQTT run mode.
- Enter the broker IP address or domain and port using the appropriate MQTT or MQTTS format.
- Enter the broker username and password when authentication is required.
- Configure the upload interval.
- Save and verify that messages arrive at the broker.
For plain MQTT, enter the broker address and port without an mqtt:// prefix:
192.168.11.163:1883

For MQTTS, include the mqtts:// prefix:
mqtts://{mqtt-broker-address}:{port}
Example:
mqtts://broker.example.com:8883

MQTTS support documented in the November 2025 firmware update has the following current limitations:
- Supports TLS 1.2 and below.
- Uploading a custom CA certificate is not supported.
- Hostname verification is not supported.
- Client-side certificates for mutual TLS authentication are not supported.
These limitations are important when selecting a broker and evaluating the security requirements of the deployment.
The current firmware overview documents a minimum upload interval of 2 seconds.
Home Assistant MQTT Discovery is an additional Home Assistant discovery function; it is not required for every MQTT integration. See:
Change uploadInterval Remotely through MQTT/MQTTS
With the firmware described in the November 2025 update, a meter running in MQTT mode automatically subscribes to:
device/{sn}/config
Publish the following JSON from another MQTT client to change the upload interval remotely:
{"uploadInterval": 10}
Replace 10 with the required interval in seconds and {sn} with the meter serial number in the topic.

This remote MQTT configuration is different from the older local /api/uploadinterval method retained in the Legacy section.
4.3 HTTP and HTTPS
IAMMETER can post data to a custom HTTP/HTTPS server.
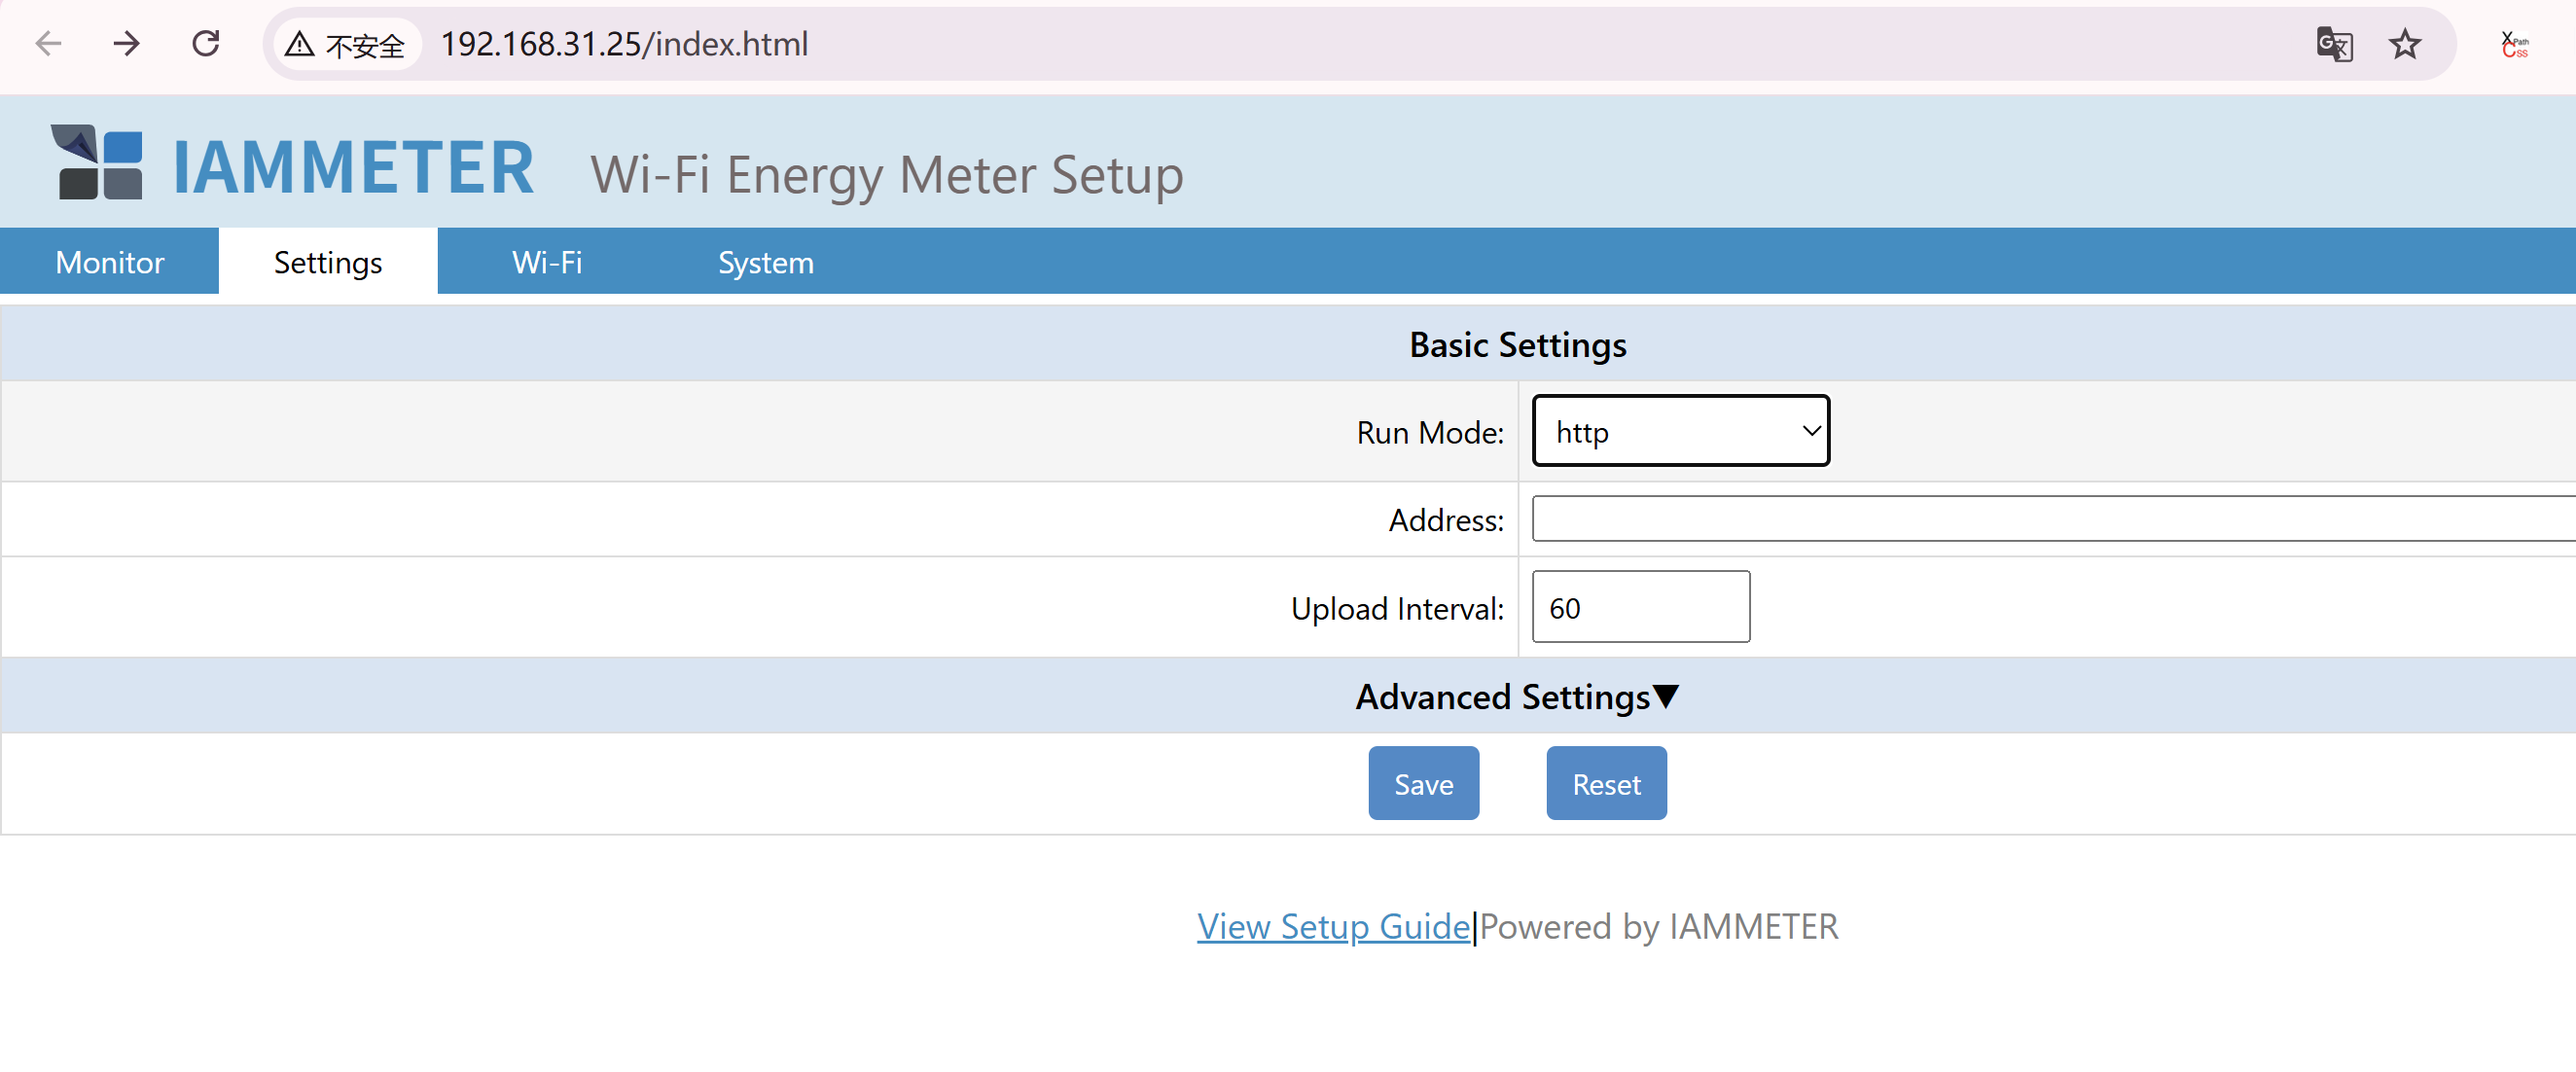
In the current WebUI:
- Select the HTTP run mode.
- Enter the server address and port.
- Configure the upload interval.
- Save and verify requests at the server.
Current firmware supports both the default HTTPS port and a custom HTTPS port.
Use one of these formats:
- Plain HTTP with no explicit port:
{address}— defaults to port 80. - Plain HTTP with a custom port:
{address}:{port}. - HTTPS with no explicit port:
https://{address}— defaults to port 443. - HTTPS with a custom port:
https://{address}:{port}— uses the specified port.
The https:// prefix selects HTTPS. Port 443 is no longer the only port available for HTTPS.
Examples:
api.example.com
api.example.com:8080
https://api.example.com
https://api.example.com:8443

See New Firmware Adds MQTTS, Remote Config, and Custom HTTPS Port for the firmware release note.
For server-side payload handling, also see Integrate IAMMETER with a Third-party Server.
5) Read Data Locally over HTTP
Connect the meter to the LAN and request data from its local IP address. These requests do not require IAMMETER-Cloud.
Test the APIs interactively: Open the IAMMETER Local API Explorer, enter the meter's local IP address and select the WEM API test page. The Swagger-style explorer lists the available local APIs and lets you send test requests directly from the browser. Your browser and the IAMMETER meter must be on the same LAN.
5.1 GET /api/monitorjson
Returns real-time electrical measurements.
The standard data includes values such as:
- Voltage
- Current
- Active power
- Forward/import kWh
- Reverse/export kWh
- Frequency
- Power factor
Example response:
{
  "method": "uploadsn",
  "mac": "B0F8933C4F94",
  "version": "i.75.97.9",
  "server": "em",
  "SN": "3E0BAF87",
  "Datas": [
    [220.0, 9.99, 2198, 11.337, 11.201, 49.99, 1.00],
    [222.5, 9.99, 1100, 11.039, 10.908, 49.99, 0.50],
    [263.5, 9.99, 1213, 10.975, 10.846, 49.99, 0.55]
  ]
}
The number of measurement arrays depends on the meter model and channel count.
If reactive power measurement is enabled on a supported model/firmware, the response format may contain additional fields. See Reactive Power Measurement Data Format.
5.2 GET /api/monitor
Returns an extended real-time response that also includes Wi-Fi information such as:
ssid— connected access-point namesig— Wi-Fi signal strength
Use this endpoint when an integration needs both electrical measurements and basic Wi-Fi status.
5.3 GET /api/wifidata
Returns firmware, device and network configuration information.
Example:
{
  "version": "i.75.97.9",
  "SN": "3E0BAF87",
  "mac": "B0F8933C4F94",
  "type": "PM",
  "ssid": "example-wifi",
  "ip": "192.168.11.62",
  "netmask": "255.255.255.0",
  "gw": "192.168.11.1",
  "dns": "192.168.11.1",
  "dhcp": 1,
  "runMode": "tcp",
  "uploadinterval": 60
}
Do not publish responses containing device serial numbers, MAC addresses, internal addressing or Wi-Fi information unless the values have been sanitized.
6) JSON Format across Upload Modes
IAMMETER uses a consistent core JSON measurement structure across HTTP, TCP, MQTT and the local API. This reduces the work required when one receiving system supports multiple transport methods.
The transport method and envelope may still affect how a receiver connects, authenticates or frames a message. Implement the receiving system against the documented format for the selected mode.
7) Modbus TCP
IAMMETER meters support Modbus TCP for direct LAN integration with compatible clients.
Typical clients include:
- Home Assistant
- PLCs
- SCADA systems
- Industrial gateways
- Custom Modbus applications
References:
Confirm the meter model, firmware, register definition, polling interval and client behavior before deployment.
SunSpec integer meter models
Firmware i.91.065.18 adds read-only SunSpec integer meter-model discovery and electrical-data reading on the existing Modbus/TCP service. The original registers, HTTP API, MQTT payloads and NEM settings remain unchanged. See the SunSpec model mapping and integration guide for connection parameters, model-specific qualifications and current validation and TCP limitations. This implementation is not SunSpec-certified.
8) Integration Scenarios
| System | Typical protocol | Example use | Reference |
|---|---|---|---|
| Home Assistant | HTTP, Modbus TCP or MQTT | Local dashboard and automation | Home Assistant Guide |
| Node-RED | HTTP, Modbus TCP or MQTT | Automation flows | Node-RED Guide |
| openHAB / ioBroker | HTTP or supported adapter | Local dashboard | ioBroker Integration |
| Zabbix | HTTP | Monitoring dashboard | Zabbix Example |
| ThingsBoard | HTTP or MQTT | IoT visualization | ThingsBoard Example |
| Custom server | HTTP, MQTT, TCP or TLS | Local or enterprise ingestion | Build Your Own System |
9) Current-interface Summary and Resources
| Requirement | Current interface |
|---|---|
| Read real-time measurements over LAN | /api/monitorjson or /api/monitor |
| Read network/device information | /api/wifidata |
| Push to a broker | MQTT or MQTTS configured in current WebUI |
| Push to a custom TCP/TLS server | TCP/TLS configured in current WebUI |
| Push to a custom web endpoint | HTTP/HTTPS configured in current WebUI |
| Poll from a standard industrial client | Modbus TCP |
| Operate without continuous data upload | Stand-Alone mode |
Additional resources:
- Latest Firmware
- MQTTS and Custom HTTPS Port Firmware Note
- Video Tutorials
- JSON Data Definition
- Modbus TCP Overview
- Develop Your Own System
- Monitor without Internet Access
IAMMETER's local APIs and open protocols make it possible to begin with real-time monitoring and later add a custom EMS, self-hosted dashboard or automation workflow.
10) Legacy Firmware Pages and Configuration Methods
The following material is retained only for meters that still run older firmware or for users maintaining an existing integration. For a new installation, update to the latest firmware and use the current WebUI wherever the required option is available.
10.1 Legacy Run-mode Page
Older firmware used the following run-mode selection page:
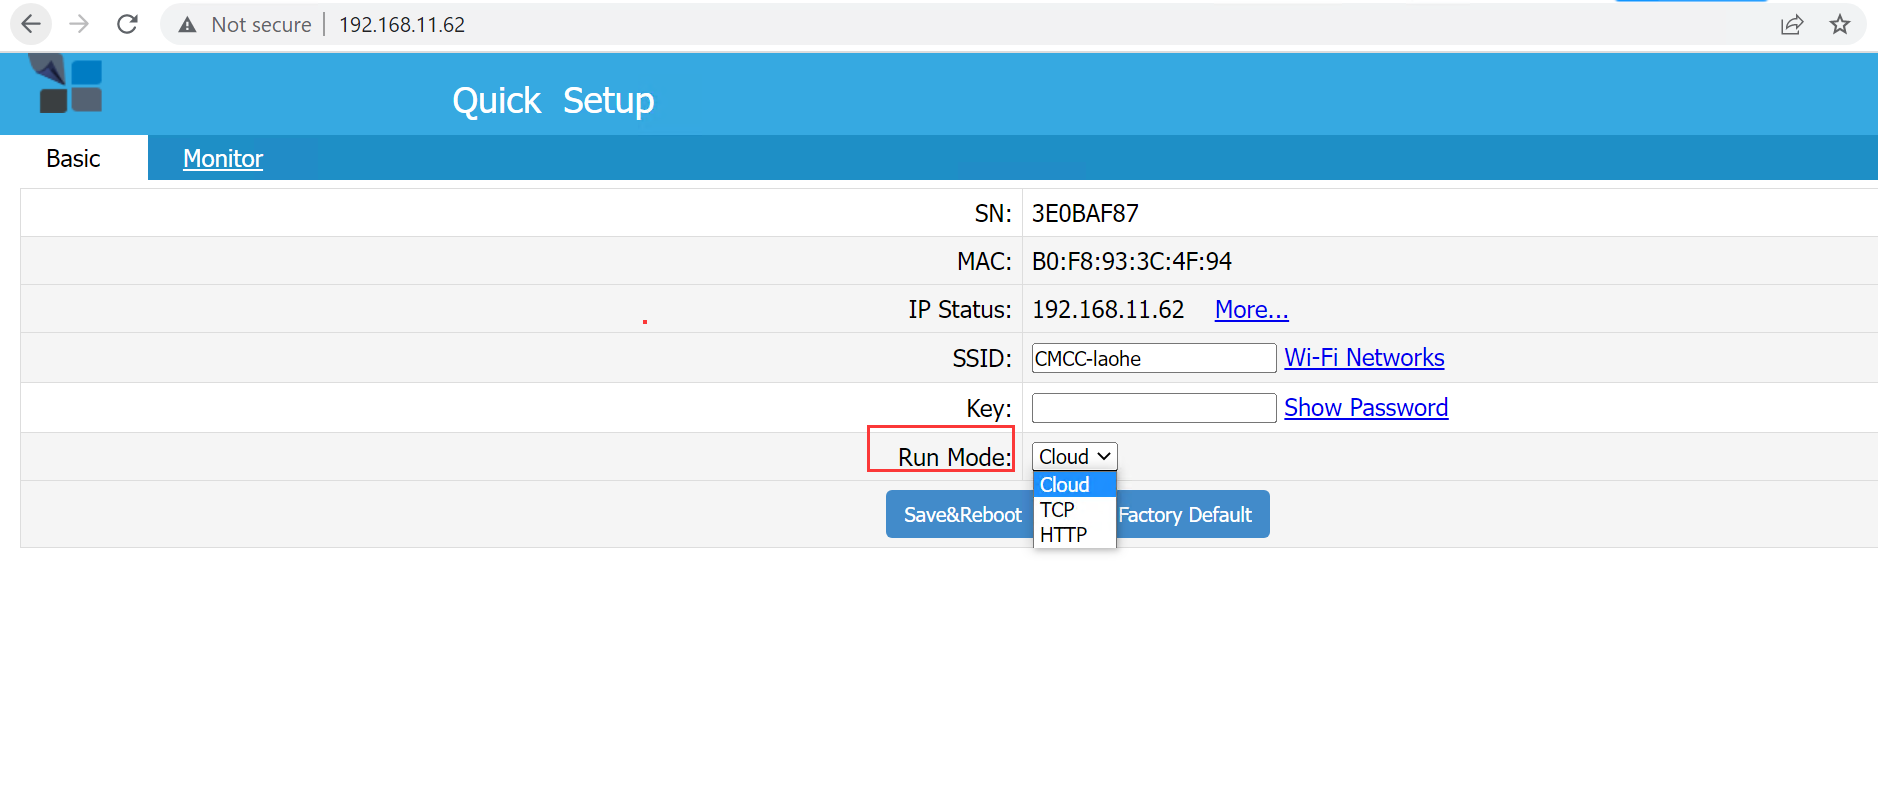
The layout and option names may not match the current WebUI shown earlier in this guide.
10.2 Legacy TCP/TLS Page
Older firmware integrations may refer to this TCP/TLS configuration page and related guide:
10.3 Legacy MQTT Page
Older MQTT documentation used this configuration interface:
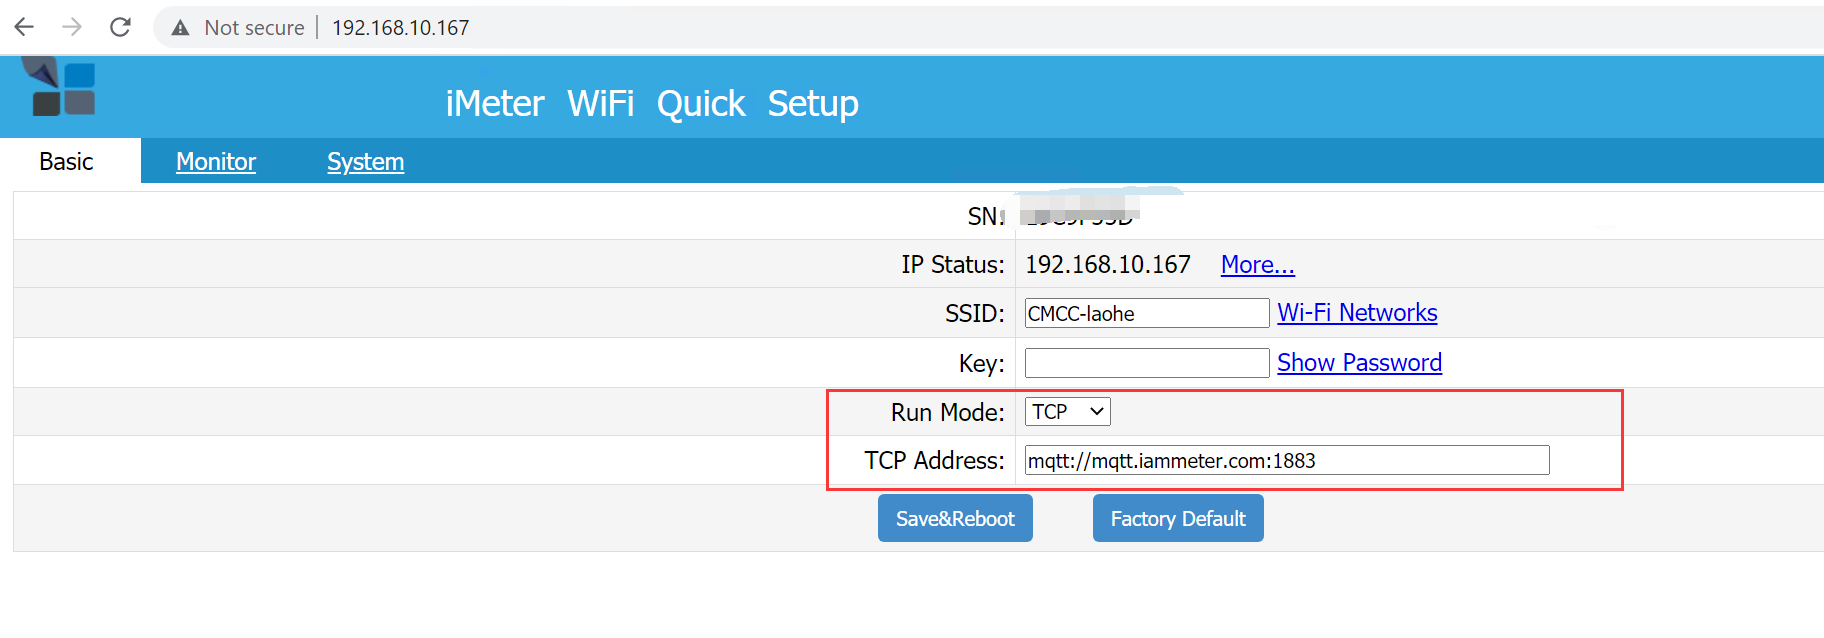
For the current workflow, use the current WebUI instructions earlier in this article and the updated MQTT Integration Guide.
10.4 Legacy HTTP/HTTPS Page
Older firmware used the following HTTP/HTTPS destination page:
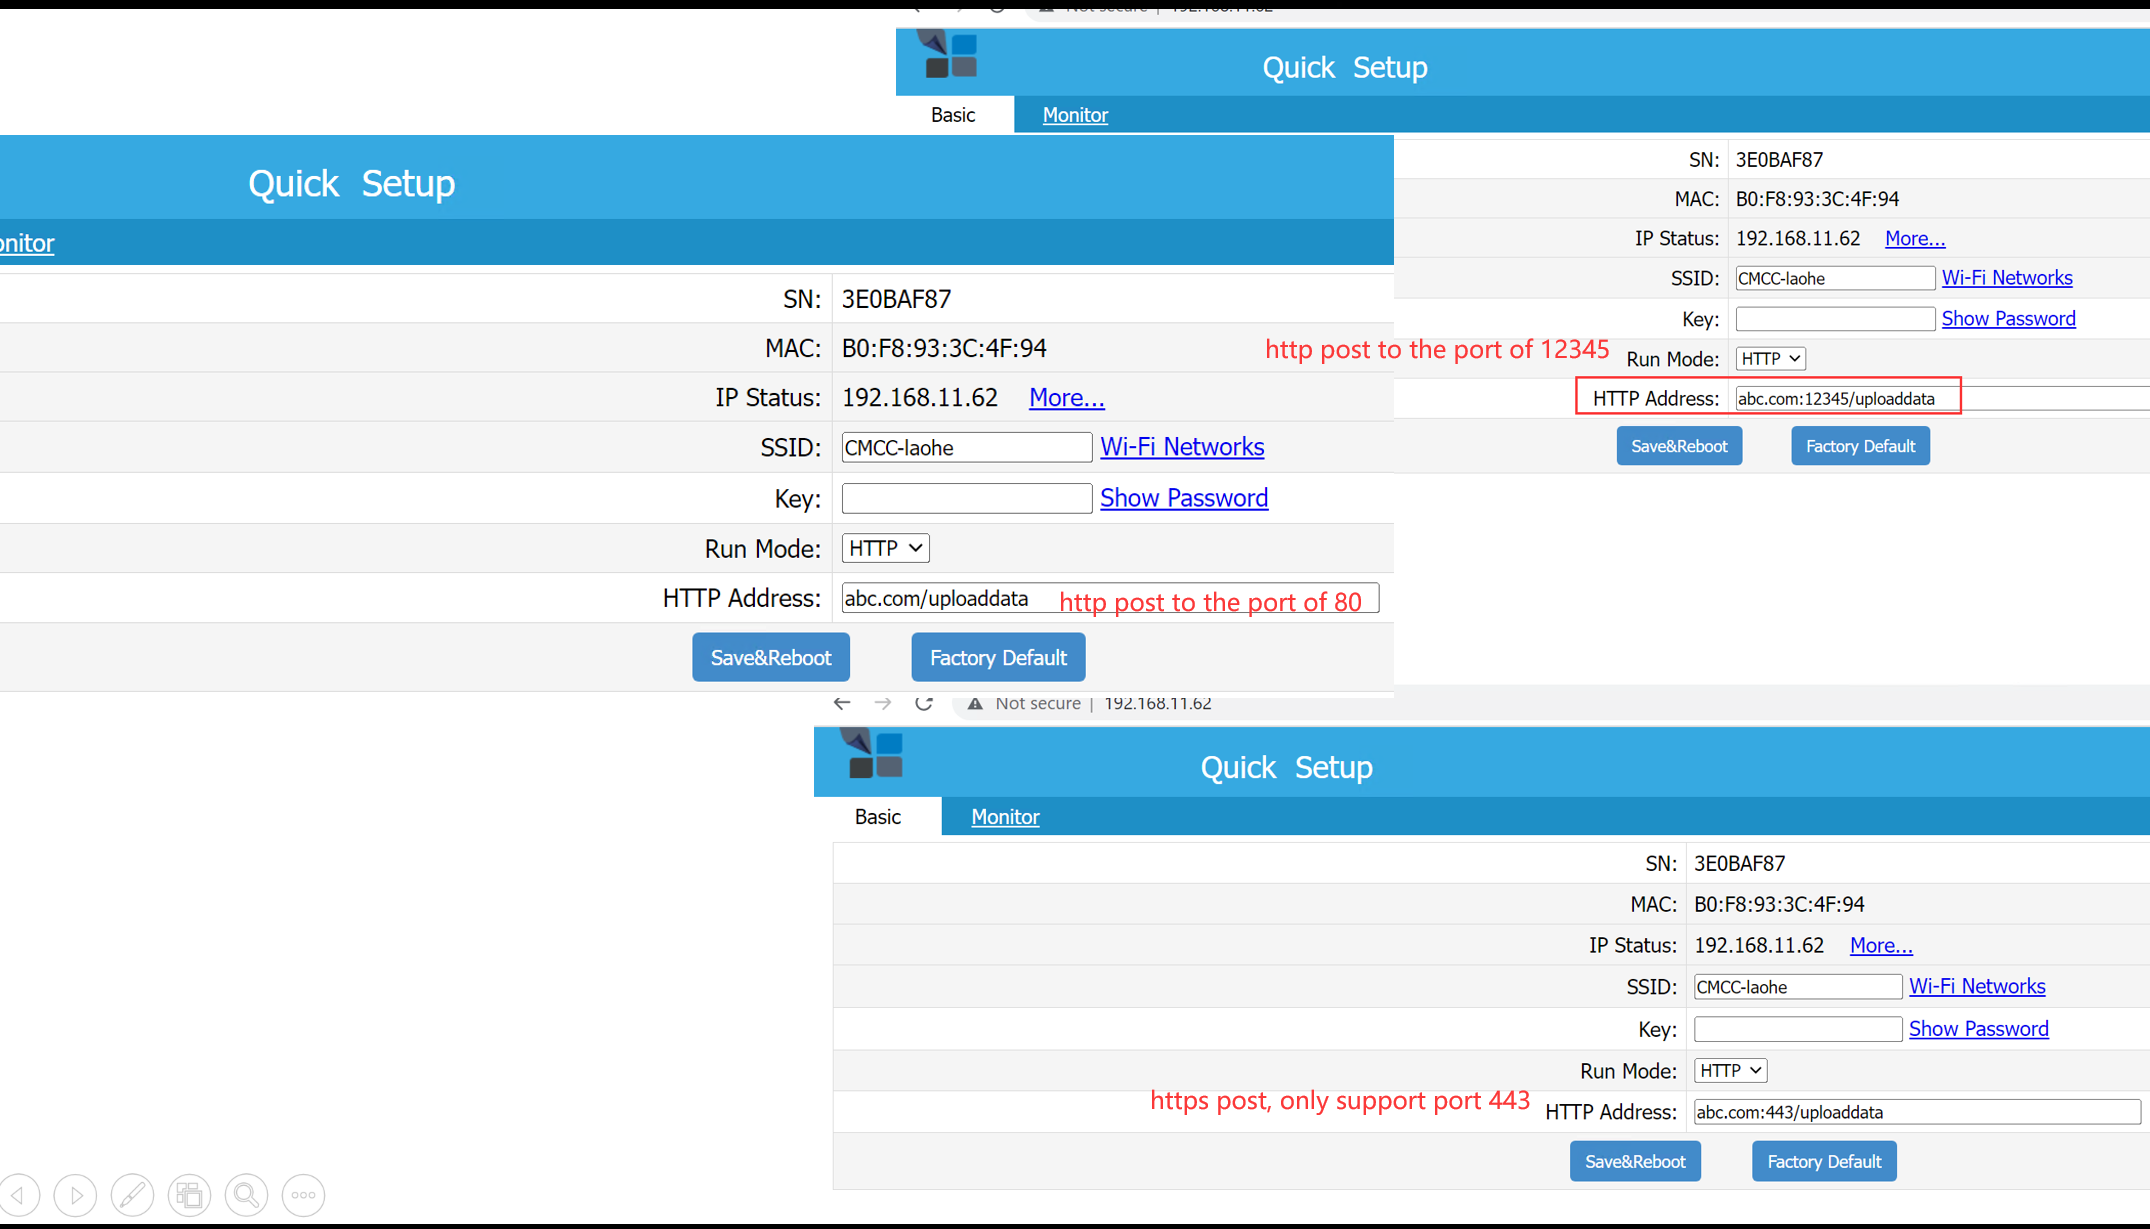
The legacy integration guide is retained at Upload via HTTP/HTTPS.
In this older workflow, HTTPS was associated with the default port 443 and did not require the https:// prefix. Current firmware instead uses the https:// prefix to select HTTPS and supports either the default port 443 or an explicitly specified custom port.
10.5 Legacy Configuration APIs
The following local API calls appeared in earlier configuration workflows. In current firmware, the corresponding settings should normally be configured through the WebUI when the option is available.
/api/uploadinterval?x=<seconds>
Legacy method for setting the non-Cloud upload interval.
/api/mqtt
Legacy method for configuring MQTT credentials.
/api/netmetring
Legacy method for enabling or disabling Net Energy Metering mode.
/api/ctcratio
Legacy method for applying the documented Phase-C multiplier in specific split-phase or balanced scenarios.
/api/reactive
Legacy method for enabling or disabling reactive power and reactive energy measurement on supported firmware/models.
/api/ratio — WEM3046T only
WEM3046T uses external CTs with 5 A secondary outputs. Older configuration instructions set the CT ratio with:
/api/ratio?x={ct_ratio}
Example:
/api/ratio?x=400
This endpoint is specific to WEM3046T and is invalid for other IAMMETER models. For current firmware, use the model's current WebUI configuration when available.
Legacy material retained for backward reference; current installations should follow the latest firmware WebUI.